Philadelphia Museum of Art to Present First Major Retrospective Exhibition Dedicated to Emma Amos (1937–2020)
October 11, 2021–January 17, 2022
Morgan Galleries and Jane and Leonard Korman Galleries 150–153
In October, the Philadelphia Museum of Art will present the first major retrospective exhibition of the work of Emma Amos. As a member of the Black artist collective, Spiral, in the mid-1960s, an active participant in the Guerilla Girls of the 1980s, and a pathbreaking multimedia artist until her death in 2020, Amos made vibrant, witty, and passionate works that challenge, unsettle, and sometimes altogether reject the dominant visual codes of American life. Across her prolific career, Amos’s art explored the links among personal biography, history, and the politics of race and gender in America. Organized by the Georgia Museum of Art, Emma Amos: Color Odyssey surveys Amos’s body of work from the late 1950s to the 2010s for the first time, highlighting her bold approach to printmaking, painting, and weaving, and the distinctive combination of disparate materials and artistic techniques that she employed to produce works of unmistakable artistic and critical charge.
In an interview in 1991, Amos remarked, “Every time I think about color, it’s a political statement.” The exhibition will explore the rich implications of that claim, following the ways in which Amos’s works investigate aspects of identity and privilege while unsettling the lines between figuration and abstraction, craft and fine art, beauty, and power. Emma Amos: Color Odyssey will begin with the artist’s early years when, finding her way to New York by way of London, she would become the youngest and only female member of Spiral, which formed in response to the March on Washington for Jobs and Freedom in 1963. These early works reveal an artist beginning to connect an interest in abstract expressionism to problems of figuration and subjectivity posed by the realities of American racism, with Amos exploring the significance of color as it relates to the Black female body. This subject would go on to become a major focal point throughout Amos’s career as she began to engage more deeply with mediums such as weaving and printmaking and to participate in the feminist and multicultural debates of the 1970s and 1980s.
The exhibition is organized chronologically and thematically, tracking how Amos pushed her painting, weaving, and printmaking practices and often combined these media to better represent the grace, beauty, and power of Black figures, from anonymous models to leaders such as Paul Robeson and Zora Neale Hurston. Color Odyssey follows Amos’s deepening critical investigation into the centrality of race and gender to the values of Western art, notably though the making of massive multimedia works that interrogate the power and authority of the artist. The Philadelphia presentation of the exhibition will give emphasis to the ways in which these thematic and political concerns pushed Amos to experiment widely with materials and techniques, particularly in print.
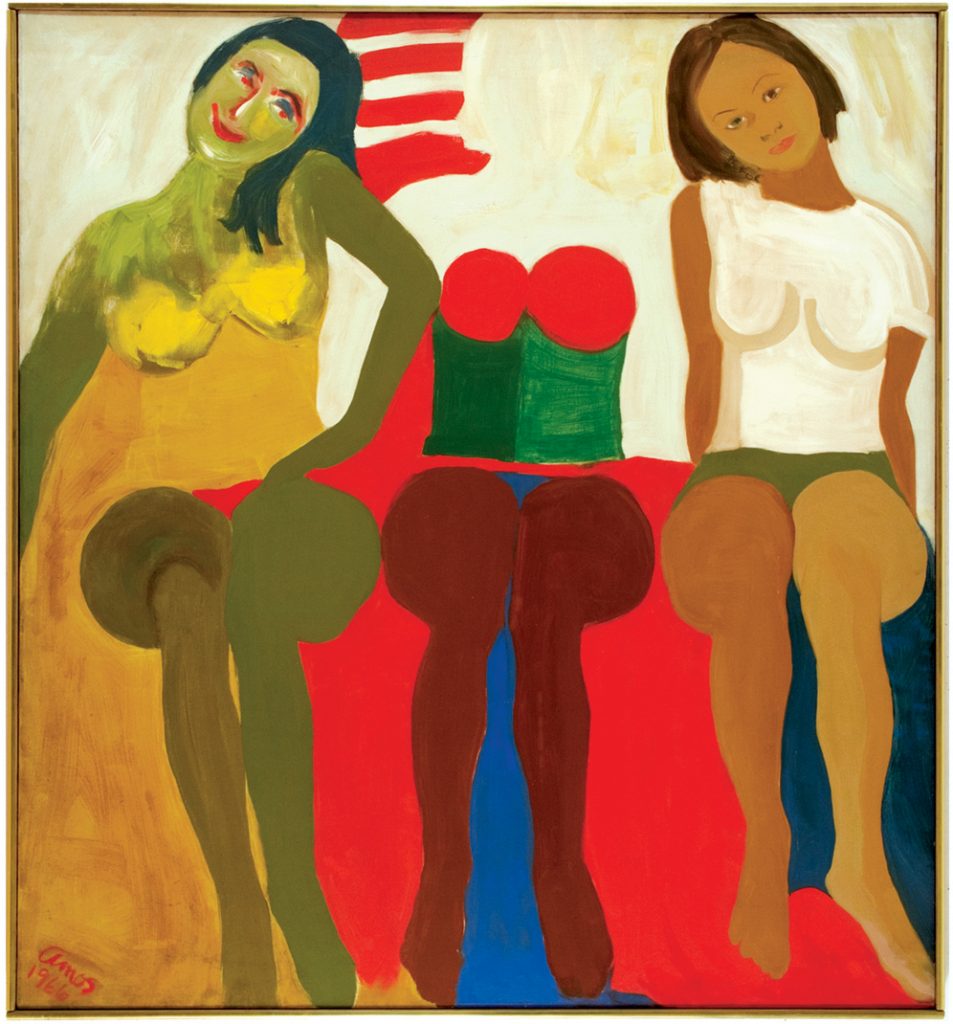
Highlights among the early works include the painting Godzilla, 1966 (Munson Williams Proctor Institute of Art) which features three front-facing seated women, one of whom is nude, another is seen clothed, and a middle figure appears faceless. Each figure is depicted with brownish limbs of various skin tones while the overall composition offers a rich arrangement of gestural forms placed in combination with flat, unmodulated swathes of contrasting color. The artist returns to the theme of the female trinity in 3 Ladies, 1970 (Philadelphia Museum of Art), a color etching, printed relief, and screen print in which lyrical gestural elements have given way to a sharp juxtaposition of graphic shapes that convey the artist’s virtuosity. This experimental, five-part composition underscores her ongoing pre-occupation with femme-centric themes. Among the notable works of the artist’s later production is Tightrope, 1994 (Minneapolis Institute of Art) which illustrates, in bold acrylic colors on linen with African textile borders, the monumental struggles Amos faced as an artist without the privileges afforded to white masculinity. In this monumental narrative self-portrait, Amos resolutely strides across a tightrope while donning a Wonder Woman costume that is only partially concealed under an artist’s smock. In one hand, she indignantly raises a T shirt emblazoned with an image of the naked torso of Gauguin’s Tahitian child bride while in the other she confidently wields a pair of paint brushes against a night sky.
The organizing curator for Emma Amos: Color Odyssey is Dr. Shawnya L. Harris, Larry D. and Brenda A. Thompson Curator of African American and African Diasporic Art at the Georgia Museum of Art. “Coming of age during the countercultural movements of the 1960s and straddling various artistic movements from abstract expressionism to pop art, Amos reckoned with issues of race, class, and gender roles that emerged in the development of her style,” Dr. Harris said. “Her imaginative and sometimes satirical take on cultural difference shifted and grew richer over the decades, merging various media and blurring categories of fine and applied arts as a form of resistance.”
At the Philadelphia Museum of Art, the exhibition is curated by Laurel Garber, the Park Family Assistant Curator of Prints and Drawings, with the assistance of Theresa A. Cunningham, Margaret R. Mainwaring Curatorial Fellow. Garber, who wrote the catalog’s essay on Amos’s prints, added: “The sweep of Amos’s career opens a window onto an artistic practice that is guided by a rich creative and political engagement in American life. Her work is at once approachable and challenging, inviting reflections on identity, beauty, and femininity. Throughout her career, Amos worked in a wide range of printmaking techniques, including intaglio, screen print, monotype, and collagraphy, and we will show the broad range of innovative editions, monoprints, and other printed works on paper so that visitors can fully appreciate the interconnectedness of her vision across media.”
Catalogue
Emma Amos: Color Odyssey is accompanied by a major scholarly volume of the same title, edited by Dr. Shawnya L. Harris, and published in hardback by the Georgia Museum of Art (ISBN: 9780915977468). This catalogue includes an introductory essay by Dr. Harris and contributions by the artists Kay Walkingstick and LaToya Ruby Frazier, each of whom offers a personal reflection on Amos. Lisa Farrington, Associate Dean for Fine Arts, Howard University, discusses Amos’s place in the history of women artists. Phoebe Wolfskill, Associate Professor of African American and African Diaspora Studies, Indiana University, Bloomington, focuses on the performativity of race and gender in Amos’ work. Laurel Garber explores the artist’s career-long printmaking practice and her collaborations with master printers. The book is available at the Philadelphia Museum of Art Store and may be purchased on site or online via Philamuseum.org.
About Emma Amos
Emma Veoria Amos was born in 1937 in Atlanta, Georgia. Her family owned a drug store established by her father and grandfather, the first Black pharmacist in the state. She attended Antioch College in Ohio, graduating in 1958 with a degree in fine art before moving to London where she earned a diploma in etching at the Central School of Art in the next year. Arriving in New York in 1960, she joined Spiral, the artist activist group which included Romare Bearden, Hale Woodruff, Norman Lewis, and Charles Alston. In 1965, she earned her master’s degree in education from New York University and later taught at the Dalton School in New York. She also held positions as a textile designer and served briefly as a host of a television show about craft. Amos was an important member of Heresies, a feminist magazine founded in 1976 by Joyce Kozloff, Miriam Shapiro, Lucy Lippard, and others. As a member of the Guerilla Girls, Amos protested art world injustices including the unequal representation of women in the arts. In 1980, she began a teaching at Rutgers University, where she would become Professor and Chair of Visual Arts at the Mason Gross School of Art. She retired from Rutgers in 2008. The artist moved in 2019 to Bedford, NH in 2019 where she died the following year. Emma Amos: Color Odyssey premiered in January 2021 at the Georgia Museum of Art and traveled to the Munson Williams Proctor Institute in Utica, NY (through September 12, 2021) before its final stop at the Philadelphia Museum of Art.
Support
The exhibition is organized by the Georgia Museum of Art, University of Georgia. This program is supported in part by the National Endowment for the Arts and the Willson Center for Humanities and Arts, University of Georgia. At the Georgia Museum of Art, additional support was provided by the W. Newton Morris Foundation and the Friends of the Georgia Museum of Art.
In Philadelphia, Emma Amos: Color Odyssey is made possible by the Kathleen C. and John J. F. Sherrerd Fund for Exhibitions, the Lenore G. Tawney Foundation, and Emily and Mike Cavanagh.
Credits as of July 19, 2021.
Social Media @philamuseum
Like DoNArTNeWs Art News Blog by DoN Brewer on facebook
Follow the new DoNArTNeWs.com
Follow DoN on Twitter @DoNNieBeat58
@donniebeat on Instagram
Affiliate Marketing [disclosure page] Shop on-line and help support DoNArTNeWs
Donate via safe and secure PayPal in the sidebar.


